High Five for Friday!!!

Here it is, Friday again!!! This week’s H5FF is going to be all wrapped up into one event!!!

WelcometoFabulousLas_Vegas_Sign_1_edit

Source

I AM IN VEGAS!!!!!! VACATION AND FUN!!!! The temperature is in the 100’s but it is wonderful to be away and not at work!!!

And for your Friday entertainment………VIVA LAS VEGAS!!!! (click on the picture)

Viva-Las-Vegas-Elvis-Presley-LaserDisc-ML101993

Source

Happy Weekend!!!!

Linking up with Lauren!

 photo H54Fbutton-1_zpsa7aaa665.png

Bedroom Progress

(Try as I might, I couldn’t come up with a better post title than that….sorry!!)

So, as always, lets start with a reminder of the bedroom that came with this little ole house…..

bedroom 2 bedroom 3 bedroom 4

When I bought this house, I knew it was my first and possibly last time to design a girly bedroom that was JUST me.  I started daydreaming, wanting new bedding, a fabulous wall color and accessories to make the space girly yet chic. I dreamt up something like this……

mood-board

The first things that had to go in the bedroom were the wall color, the yucky brown carpet, the pink vertical blinds near the cubby, lights/ceiling fan and the built-in dresser under the tv above.

IMG_3425

The built-in dresser came out super easy. It was simply screwed right into the wall. Removal of some screws and it lifted right out.  Seeing that there was no carpet underneath reinforced that the carpet had to go!  Even with the baseboard cut-out on the bottom of the dresser, I was able to sell it on Craigslist for $40! Woot!

IMG_3428 IMG_3431

Carpet removal was a super easy but super smelly process.  With the help of some friends I sliced the carpet into sections and just rolled it up and carried it outside.  The carpet pad underneath was a little messier because of various staples (that had to be removed one by one as I slid myself around the room on my bottom trying to NOT sit on a rogue staple!)

From the start, I was drawn to a relaxing, resort-like, almost Tiffany-blue color for the walls.

IMG_3404

I looked at these colors for days figuring out which wasn’t too dark and moody, wasn’t too bright & comical, and would feel like a relaxing vacation space every day. Finally I settled on the third from the left, top row.  Grand Hotel Mackinac Blue from Valspar.

IMG_1276

(iPhone pic = this is the best I was gonna get) The floor underneath was in OK shape. For a while I considered having it refinished and just having gorgeous hardwood floors.  But I got some estimates and some of the spots around the room were not in the best shape and needed replacement boards.  My total was going to be several hundred dollars more than getting carpet, AND THEN I would want to spend money on fabulous area rugs, so carpet it was.  I am totally happy with my decision.  As much as I love gorgeous, dark hardwood floors, I love having warm cozy carpet in the bedroom.

After removing the yucky old carpet, having the room painted, replacing both light fixtures, adding wooden blinds, and painting the last built-in dresser, here is the progress I am living with thus far………

IMG_3726 IMG_3727 IMG_3728 IMG_3733 IMG_3732

IMG_3730

Let’s revisit my initial to-do list for this room, shall we???

  • Remove smelly, badly imprinted carpet
  • New carpet or refinish hardwood floors depending on cost
  • Remove built-in dresser 
  • Remove white shelves on wall above built in dresser 
  • Paint entire room
  • Paint inside of closet & cubby area near window
  • Replace white ceiling fan
  • Replace standard “boob” light 
  • Switch out outlets & light switches for white
  • Replace pink blinds throughout the room
  • Paint built-in dresser next to closet
  • Build bed frame with headboard for bed
  • Art for wall opposite large closet and above leather bench
  • Something for wall above hampers
  • Get suitable, SMALL nightstand.  Right now I am using a skinny end table that I used to use in my living room. I keep it classy, what can I say?!?

And the major to-do on the list……..handle this mess!!!

IMG_3739_edited-2

I am ashamed that I even put these pictures up, but hey, keeping it real!! I have lived here almost one year and my shoes are still living in 2 moving boxes below my window.  As you can see by the pics above, there isn’t much room left in this bedroom for shoe storage.  I don’t want to keep shoes at the bottom of my closet so I have been brainstorming the past few months and think I have come up with something!  My solution has been shipped so hopefully in the next week or so I will have cute, functional shoe storage. Because brown moving boxes are a sure way to scuff up my kicks!

High Five for Friday!!!

HAPPY FRIDAY!!!! I am totally excited for the weekend for no good reason other than IT’S THE WEEKEND!!!  Here are the goods from my week!

Friday

1.  Last Friday the fella and I went with some friends to Hibachi for dinner. It was DELISH!!!  I had been to hibachi once before and do not remember the food being as FAB as this was! Yum, I want a repeat performance today!

2.  HGTV Star started two weeks ago.  I’ve watched some of the earlier seasons and thought it was okay but haven’t paid much attention over the past few seasons.  I have watched the first two episodes and so far I’m a fan! Not always sure I agree with the judges on who should win each week, but that’s the beauty of design right? To each his own?

3.  I sit at a desk all day counting beans (accountant joke…..nerd).  So whenever I get a chance to be outside without sneezing my head off, I take it! One day walking between buildings, I saw this gorgeous butterfly on the side of my building. As I got closer to take a pic it flew away. I chased it to two more landing spots before I could snap a picture! That’s my idea of communing with nature…..free from dirt, crawly bugs, etc.

4.  Last Sunday I ran the Color Me Rad 5k in Philly with my boss! It was SUPER fun!! Here is an after picture. This is as clear as I could get. I had my phone wrapped in plastic wrap to protect it and by the end, the color powder on it made for some blurry pictures! But the color mess was AWESOME! I totally can’t wait to run it again next year!!!  (And thanks to some chiropractor work and little-to-no training all week, I could run the majority of the route!) WOOT!

5.  Lastly, my main excitement for the weekend is that I am going on a short vacay next week!! After today I only have 2 1/2 days of work standing between me and a flight across the country to temps like this!!! Right now it’s in the 80’s here at home, but I will take these 100+ temps just to get away, see some new sights, have some fun and relax by a pool!!! Hurry up Thursday!

As always, I’m linking up with Lauren!

Happy Weekend!!!!!

  photo H54Fbutton-1_zpsa7aaa665.png

Getting Rid of Beetlejuice (Wallpaper Removal)

(Warning:  If you are new around these parts, you missed my disclaimer about my pictures. My DSLR camera lens is broken and until I pull the trigger on my wallet to have ‘er fixed, I am stuck with yucky cell phone pics!)

One of my favorite things to do is help other people with projects around their house. Spending someone else’s money and having more than just the few rooms in my house to design?  What’s not to love???

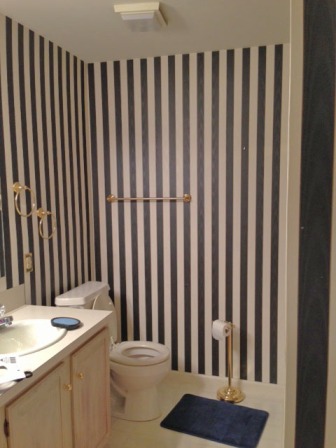
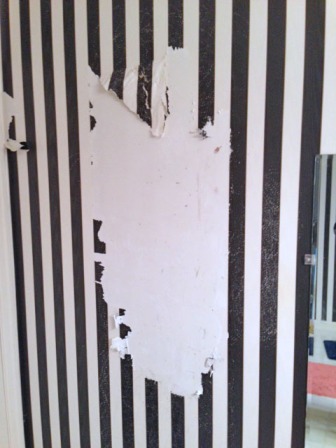
My fella moved into a new house around the same time I moved into mine last year!  The previous owner of his house did absolutely nothing to the house since the house was built in the 90’s, including NOT removing heinous wallpaper in the second bathroom and kitchen!  The second bathroom in his house is for his daughter, right outside of her bedroom. But no 9 year old should be subjected to this (see below) getting ready each day!

WPBathroom 1

WPBathroom2

WPBathroom 3

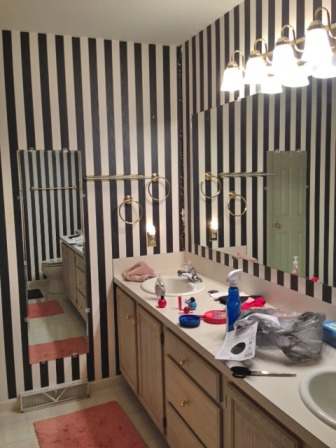
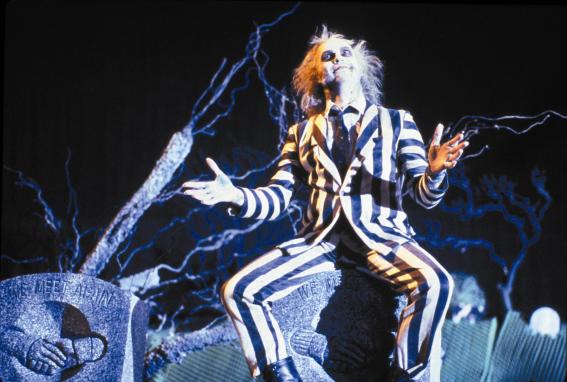
Pretty hideous, eh?  It totally reminds me of Beetlejuice!! Don’t you think?!?!

Beetlejuice

Source

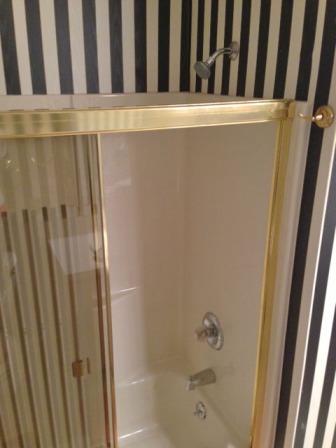
It’s actually enough to hurt your eyes while standing in there!  Along with the gold accents, bubbled linoleum floor and sort-of whitewashed cabinets, this bathroom was in MAJOR need of an overhaul and new design!

First step…….removing that wallpaper!  My fella is definitely a reasearcher and I am definitely one to just get right at it and figure out what works and what doesn’t.  He got several professional opinions on what method & products were best to take down the paper, and also some estimates to have it professionally removed.

Me being the optimistic DIY-er, I said we could totally do it, no issue!!!  It appeared that it would be pretty easy since most of the corners were bubbling and pulling away already (assumably due to shower steam over the years).  Boy was that assumption WRONG!!

I am going to highlight the different methods we used to take down the paper.  Due to schedules, I only helped a little with this project, and he and I DEFINITELY differ on which method is the best.

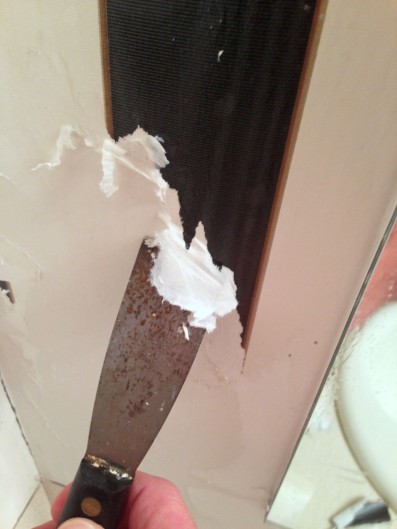
First, we got this Piranha wallpaper paste remover at Lowes.

PiranhaSpray

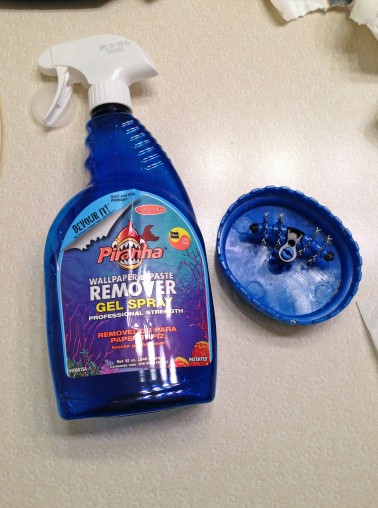
The bottles suggest scoring the wallpaper with the scoring tool on the right then spraying the remover on the walls and letting it set for 15 minutes.  One of the two of us (cough, not me, cough) is exteremly impatient and got right to work trying to pry up the wallpaper.  It didn’t work quite so well and I definitely recommend waiting the full 15 minutes for the solution to fully saturate the paste behind the paper making removal easier.  We made SOME progress with this method, but it wasn’t removing the paper in large enough sections.

wallprogress

We just stared in dismay thinking of how much wallpaper was left……next method.

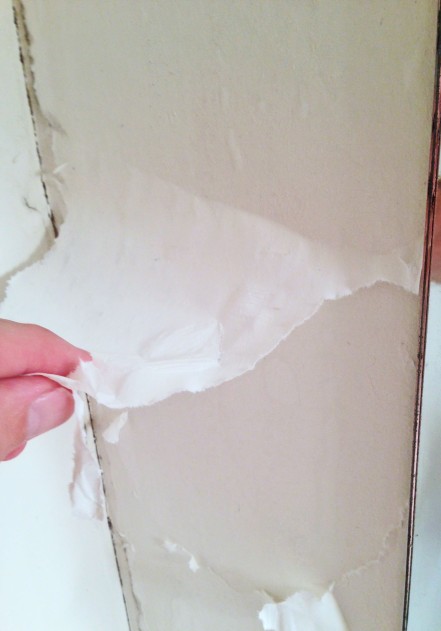
Another suggestion was just to use a bucket of warm water and a sponge.  Peel up some of the paper if you can with a scraper and then just soak the paper and glue.  The water getting behind the paper will soak the glue and help it pull off.

IMG_2376

IMG_2349

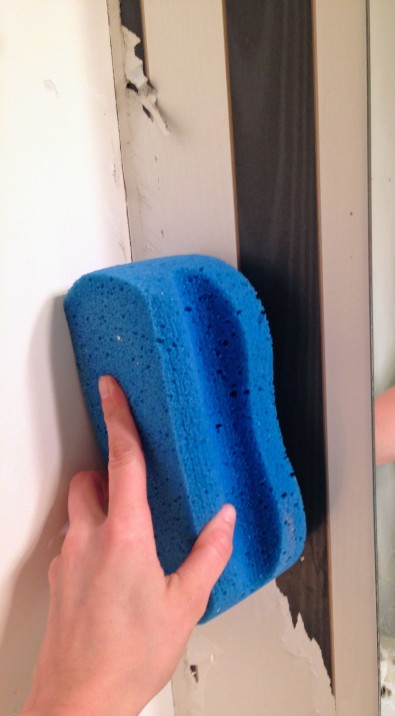
This method worked pretty well, but typically removed the paper first, leaving the layer of glue behind…..

IMG_2378

The glue would come off by wiping it down with the wet sponge and scraping it off.

Next he borrowed a steamer from a friend of his who is a painter.  This was MY favorite method by far!!!

(We have no pictures of this process because he doesn’t yet understand the need for all of the pictures in blogging so he returned the steamer before I remembered to take a pic!!)  This one from Amazon is similar and should work just as well.)

Steamer

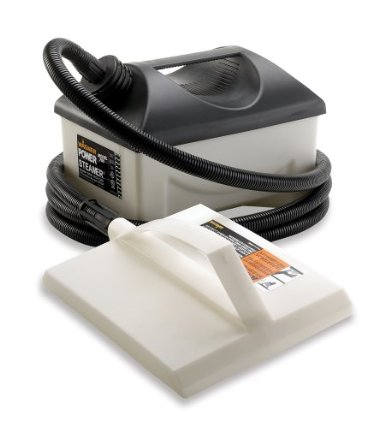
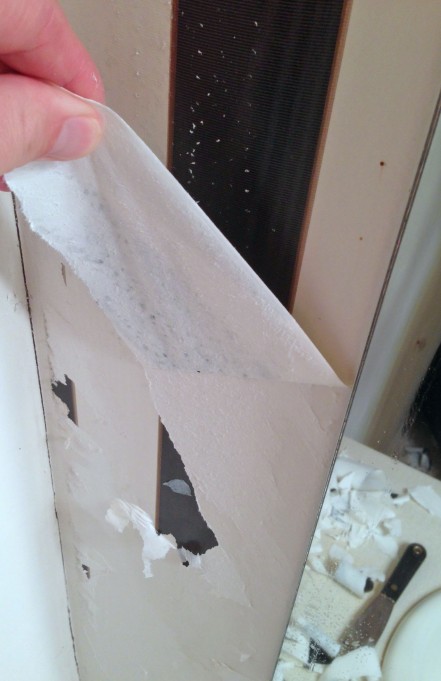
 With the steamer, I scored the wallpaper lightly. Scoring too much made too many holes and the paper wouldn’t rip off in large sections like I had hoped.

Once the paper is scored, start pulling up a small section if possible and hold the steamer 2-4 inches away from the paper.  The water will run down the paper…… just BE CAREFUL!! That joker gets hot and the steam is fierce!!!

Anyway, hold the steamer in place for 5-8 seconds allowing the steam to soften the paper and the glue.  After that time, SLOWLY begin pulling the paper upward (sidenote, I found the best way was to start from the bottom and remove the paper in an upward direction – probably just personal preference!)

IMG_2379

Again, this method seemed to remove most of the paper, leaving behind the glue, but another few seconds (only 3-4) with the steamer over the glue, it scraped off SUPER easily!

IMG_2382

Well, there are the three methods we used……..the bathroom FINALLY looks like this………

IMG_2383 IMG_2384

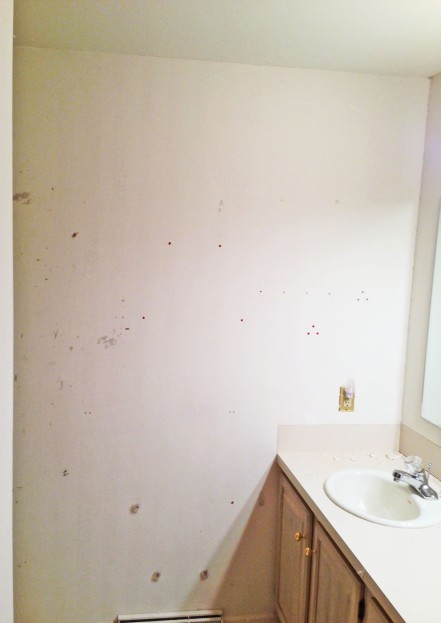
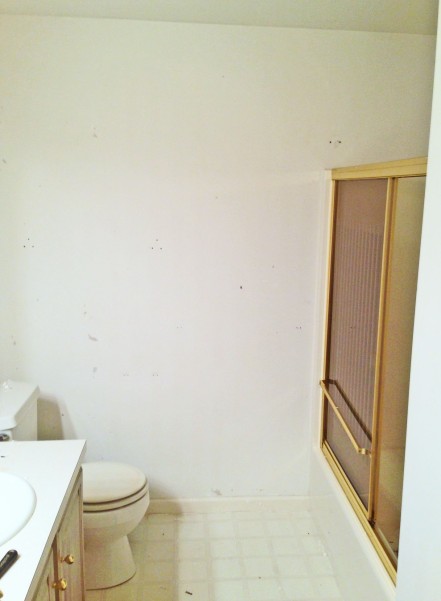
There are a TON of holes in the wall that need to be spackled and sanded.  Unfortunately, there was really no way of preventing damage to the drywall when removing the glue. Sometimes – miraculously – when the paper came off WITH the glue, it also took off a section of drywall paper. So that has to be fixed.

But doesn’t it look SO MUCH better already?!?! It even seems bigger.  I cant wait to get rid of the gold shower door and other golds around the room!

So, to grade the methods we used:

1.  Piranha wallpaper paste remover :  B-

2.  Scraper/bucket of water:  A-

3.  Scraper/steamer:  A-

I vote that the steamer was my favorite method. The steam seemed to have a more widespread effect removing bigger chunks of paper and glue. And I found it strangely relaxing!!!

I asked the fella his favorite method and his response was “NONE!!!”  He found nothing about this relaxing or fun! BUT, I made him pick and his choice was the bucket of water.  He thought the steamer made too much of a drippy mess. And burned!

So……have you been removing any old, ugly, horror-themed wallpaper?  What are your favorite methods to use! Tell me!!!

The Great Outdoors

While mowing my grass one day, I realized that in sharing my house tour and to-do list for the inside of the house, I never showed you much of the outside other than a front shot of the house! Here is a little tour of the outside of my house including my wish list of what I will be and would like to be changing in the future!

OS2

The outside is pretty simple. The house is mostly brick with some beige siding at the top, window awnings, beige shutters and front door, and brown trim. The front yard is raised both on the side of the driveway and from the front sidewalk.

OS3

In the future, I would love to……

  • Paint the siding
  • Paint the shutters
  • Paint the brown trim
  • Remove the window awnings
  • Paint the storm door and the front door
  • Replace the hardware on both doors (it is gold) along with the gold house numbers to the right of the door (because of some Photoshop magic you can’t see those numbers and try to find me!)

IMG_3721

I share the driveway with my neighbors. You can fit two cars in my driveway, just front to back, not side to side. Good thing its only me!

At the top of the driveway there are steps that lead up to a small wooden deck.

IMG_3714

The deck is home to my grill, trash and recycling cans, my sun chair and the hose reel. It is in pretty good shape structurally but it needs a good pressure washing and coat of stain/sealer.

At the edge of the wooden deck begins a brick walkway that leads to the shed……

IMG_3715

The shed and the pathway are in great shape and don’t need any work. Except for those dang weeds in the mulch bed below the tree…whoops!!

IMG_3716

I have this super fun vine that grows around a post that holds the rain gutter coming off of the house (see 2 pictures before this one). Just past that vine is my backyard. There is some nice grass and an empty mulch garden in the corner! I planted flowers out front, that was more than enough! Maybe next year I will be adventurous enough to plant a vegetable garden or something back here…..which will most likely be eaten by the neighborhood cat that lives under my shed!

IMG_3717

See how the brick path leads to the gate at the back? Well technically it leads only to my neighbor to the back’s back yard! Strange! Especially since we haven’t even met yet!

I have to mow the grass once a week and weed whack around the fence and gardens. I am SUPER allergic to grass and especially fresh cut grass. I have wanted to hire a lawn boy to handle my yard but that’s just silliness given how small it is. SO, to combat my allergies, small yard, as well as the raised yard out front, I invested my pennies in one of these bad boys………

IMG_1305

That’s right. I’m taking it old school. No gas/oil mixture to deal with, no smelly cut grass, and no lifting a huge mower up and down the deck steps and the front yard steps.

IMG_1272

Not to mention, its actually harder to push than a regular mower! Built-in work out! (Note, I do not recommend wearing flip flops to mow and using your foot to try to get a piece of mulch out of the rotary blades!)

OS1

Off the back of the house is a big covered porch. I love it. It is accessible to the deck and looks out into the backyard.

IMG_3719

It’s big enough to hold my table for six and still have a whole other half left. There is outdoor carpeting and a ceiling fan.

IMG_3720

There is the door into the kitchen as well as a window that is over the sink, looking out into the back yard. That is probably one of my favorite spots in the house!

Anyway, my wish list for out here…..

  • Paint the large green wall
  • Paint the green beams on the screen “wall”
  • Replace the old, brown, industrial ceiling fan
  • Remove the light blue “welcome” sign that has been permanently glued to the brick wall….I swear they used cement! That joker isn’t coming off!
  • Paint the back door
  • And my ULTIMATE fantasy for this space is to build an awesome outdoor lounge/seating area like this along the big green wall…….

101396259.jpg.rendition.largest

Source

Ahhhhh….wouldn’t that be amazingly cozy to relax on in the evenings under the covered porch without bugs/mosquitos attacking?!?

Well, there is the outside! As you can see I haven’t crossed a single thing off the to-do list! Right now its enough for me to make sure the grass gets mowed and the gardens get weeded! Possibly in the fall I will tackle some of the outdoor painting things to be done! Stay tuned!

High Five for Friday!!!

If you were here last week, you saw my introductory High Five for Friday post!  Lauren over at Lauren Elizabeth does a weekly post called High Five for Friday where she highlights 5 of her favorite things from her week and invites other bloggers to do the same and link up over at her page.  Taking a break from house projects and other normal blog stuff, here is my 2nd H5FF post!

photo-14

1.  This Sunday I will be running my first 5k. I have NEVER been a runner and my whole life have seen it as pure torture, but a life goal of mine is to be able to run one of these crazy races that everyone does. So my boss and I signed up to run in the Philly Color Run this weekend! HOWEVER, I am totally doing it with a bum leg courtesy of my bad sciatica nerve. We will be walking most of it seeing as how just walking down the steps makes my leg buckle, but it’ll be fun nonetheless!!!

2.   This second week of June is a busy celebration week. My mom’s birthday was Wednesday, my fella’s birthday is Sunday (along with father’s day) and my nieces get confirmed on Sunday. Lots of card and present buying to be had this week!

3.  My fella works outside most of the day and will frequently send me amazing iPhone pics of flowers he sees. It’s his own special way of being romantic!  They are flowers that will never die!! I definitely have a project in mind for all of these pictures! Isn’t this one gorgeous?!?! They totally brighten up my day, stuck inside at a desk!

4.  These earrings from Elisabeth Ashlie came in the mail this week! They are totally gorgeous and I can’t wait to wear them! They are amazing quality and are sold for an amazing price! Make sure you check out their shop!

5.  Some of my best ideas come to me when I’m doing something totally random.  One morning while blow drying my hair for work, I had an epiphany on what to do with my cork board wall!! Once the idea was in my brain I had new motivation to attack that cork with a vengeance!! The battle is slowly moving along but there is a new fuel to my fire and I’m excited to just get to the fun part!!

Well that is my week and upcoming weekend in a nutshell!! Think good thoughts for Sunday that I can actually run from the starting line and not look like a total fool stopping after 5 steps!!!  Hopefully I’ll have lots of fun color-filled pics to share next week!

Happy Weekend!!!

I’m linking up over at Lauren Elizabeth! Make sure you stop in to check out everyone else’s high fives!!!

 photo H54Fbutton-1_zpsa7aaa665.png

HomeGoods Happy

I work entirely too close to a HomeGoods….like 2 minutes away. I drive past it daily and go right by the door when I hit the gym……way too close and way too dangerous!

Not only do I have a HomeGoods near work, I also have a HomeGoods near my weekend “vacation home” (that’s what I call my fella’s house where I usually spend the weekends).  He lives 10 minutes from ANOTHER HomeGoods that I go right by every time I go to visit. That’s two different HomeGoods to spend way too much money on fabulous items!

Whenever I go into HomeGoods, I am guaranteed to come out with SOMETHING, even if it is only a shower curtain liner…..but normally I walk around dreaming of the 75+ other items I would buy if I had all the money in the world and a house big enough to hold everything.

So, in true HomeGoods addict fashion, I hit up both of “my” HomeGoods in one day to see what goodness they had in store (get it….in store?!?!?!)

Anyway!  I absolutely LOVE the glassware section of HomeGoods. And tall vases have always been a favorite of mine.  These vases would be awesome in a huge two story entryway in any color!

IMG_2209

I absolutely love this wooden bowl.  I think it would look amazing on a long, kitchen island in a gorgeous, white-with-dark-wood-accents kitchen. I just noticed that vintage Coke tin next to it. That’s pretty cool too!

IMG_2210

Paint dipped baskets are super popular right now all over blog-land and Pinterest.  This one was super cute and would be cute in a kids bedroom to hold toys or in a living room for extra  storage.

IMG_2212

I loved this white-washed storage box with the Moroccan inspired stamp, however, they were a little pricey for me. The biggest was $34 I think.  This could easily be recreated with a cheap wooden crate from Michaels, some white paint and then a simple stamp in a fun color.

IMG_2211

I am a total sucker for heavy, cozy blankets. I would buy every warm blanket I saw if it was feasible.  This white throw looks a little crazy in the picture but in person it was really heavy and cozy, but seemed light enough for summer weather. I patted it lovingly and walked right on by!

IMG_2213

The mirror section at HomeGoods is always one of my favorites because they always have HUGE, gorgeous mirrors…..like this one on clearance for $149.  The architectural elements are awesome! I would have took that home immediately if there was even REMOTELY a place to put it in my tiny house!

IMG_2215

There was also this HUGE gold quatrefoil mirror. I think this one was only $149 as well.  The picture doesn’t really show it, but this joker was HUGE! It was as tall as I am.  It would look amazing in a huge, two story family room over a fireplace, or up a grand staircase. SIGH…..someday!

IMG_2217

Now, unlike the clearance mirrors, I never really find much in the furniture section. I think the stuff is way overpriced and nothing really ever catches my eye; however, the day I was there, this chair looked so cozy and rustic to me.  It would be great on an enclosed porch or in a sunroom.  But again, I think it was over $300!  And this curved bench was gorgeous, but $249!

IMG_2218 IMG_2236

I totally fell in love with this light but I went in to this shopping adventure telling myself I was going to be good – for my wallet’s sake!  I loved that when the light was off, you couldn’t see the lightbulb so it just looks like an awesome white ceramic vase. I totally am still crushing on this light for my living room. I think it was only $19.99!

IMG_2219

The art section at Homegoods is usually hit or miss for me – more often a miss.  There was, however, lots of inspirational wisdowm floating around this day. I felt like HomeGoods was a self-help book!  My favorite, Fake it Til You Make it!  

HG Aart

As you can see above with those journals, the stationary aisle is usually a treasure trove of things I want but never really need, like lots of thank you cards, blank note cards, etc. Makes me want to get back to handwriting notes and mailing them to people rather than email and text messages! But the journals they have are great. I wish I could buy one for every day of the year there were so many to pick from. Like these gold beauties…..

HG Books

I may or may not have bought the gold polka dot notebook (it was only $3.99!!!!!)

Wow, this is getting long, but there was so much goodness at these two spots! Just a few more……you hanging in there?

Storage of any kind makes my heart beat faster! Its a sickness. Organizing other people’s messes especially! These boxes were so unique. They were made out of recycled rice and coffee sacks, so each box is different.  There were all different sizes to really fit any storage need. They smelled a little funny due to the material.  Luckily you can’t smell that through the computer screen!

HG Boxes

Okay, industrial, rustic pieces seemed to be very common at HG this time around. All of these pieces were great……

IMG_2234 IMG_2235 IMG_2231 IMG_2228 IMG_2227IMG_2220

One of these things above came home with me…….and I really wish it were the two Asian statues to stand guard by my front door. But instead it was the $9.99 metal magazine rack. SO CUTE!  If I lived in a cottag-y house with more room, i would hang those gardening pitch forks on the wall (they are actually meant for gardening, not decor) along with that circular shelf.

And last but not least were these pretty pillows. I totally wish this was my living room color scheme and not my future bathroom scheme. I thought long and hard for a way to use these pillows in the new bathroom! But sadly I just patted them and walked on by.

IMG_2238

Whew! That was quite a trip huh? Hope you enjoyed virtual shopping with me. The next time I do this, my goal is to spend $0……likely to happen? Probably not!  Tell me in the comments what was your favorite thing you wouldn’t have been able to pass up buying?!?!

Mercury Glass Faux Sho! (An oldie but goodie!)

Since I have ownership of both this blog and my old blog here, it is more than perfectly acceptable for me to steal my own material!!! One of the most successful posts I had over at the old blog were my instructions on making faux mecury glass. I wanted to share it here for any new followers and anyone else stumbling in from places like Pinterest etc! Here are the instructions from the original post!

I had been in love with mercury glass everything….vases, lamps, etc. but was never willing to spend the money on the high prices I saw. I did a lot of research and there are lots of great tutorials out there to help in making your own. The tutorial I used to guide my adventures in making my own was from here.

As I learned in my faux-mercury glass research, the key “ingredient” to knock-off amazing mercury glass decor pieces was the Krylon Looking Glass spray paint…

looking glass

After driving all over creation, I learned that this is not sold at Lowes, Home Depot, Wal-Mart, Sherwin Williams or ACE Hardware. After actually doing some research I found out it is sold at Hobby Lobby, Michaels, and JoAnn Fabric. I ventured to Michaels and searched the spray paint section…..no luck. I headed to JoAnn’s…….again, nothing. I did some quick research on my phone and saw that Michaels has it, but you have to look in the glass paint aisle.

Back to Michaels I went. You can imagine the ecstatic-ness when I finally found it in the glass paint aisle. The paint was $12.99 (sort of pricey) but with a 40% off coupon, $8 mercury glass was within my reach!!!!

If you are going to make your own faux mercury glass, I HIGHLY suggest practicing on some junk glass that you are okay to mess up. GoodWill is a good spot to hit up for some cheap vases/candle holders/cups, etc. I had a bunch of extra vases so I got to work…..my first two attempts were nothing to be proud of……read – total failure. However, after some practice on my junk glass I got it just right. This tutorial will help you make awesome mercury glass on your own…and for cheap!

Supplies

  • Krylon Looking Glass Spray Paint
  • Glass vase, candle cup, etc.
  • Spray bottle with 1/2 water, 1/2 vinegar
  • Paper towels
How to

1. It’s best to lay your piece on its side, if possible. You will be spraying the INSIDE of the glass. The paint is sprayed on the side opposite of the mirror finish.

2. Spray the Looking Glass paint in short, light bursts, holding the can approximately 6-8 inches away from the opening of the glass. After each spray, turn the glass a quarter turn. The Looking Glass paint can be runny, so the key to successful coverage is the light, short bursts. If your paint “puddles” on the glass, you can try to wipe it up a bit but it won’t cover evenly.

3. The paint will appear a dull gray at first, but in just a few short seconds, the wonderful mirror-magic will appear right before your eyes!

img_1599

4. Allow your paint to dry for only about 60 seconds.

5. Lightly spray the inside of the glass with the vinegar/water mixture so it beads lightly on the paint. The vinegar is acidic enough to begin to eat away at the paint on the glass.

img_1700_edited-3

6. Let the beads “set” for a minute and tightly wrap your pointer finger with a sheet of paper towel. Soak the paper towel with the vinegar/water mixture.

img_1690

7. Begin to “push” on the beads of water with the paper towel to “break” the paint…..

img_1692

Its easier to watch your work through the outside as you go so you can see the “pattern” you are making in the paint. Be careful to keep the paper towel tight around your finger, or else you will wipe away the paint on the side opposite of where you are working.

When “pushing” the paint, push firm enough to move the paint, but do not wipe the paint away. The key is to just move the paint around – creating a crackle effect, rather than wiping it off.

Once they were dry, I sprayed the inside of mine with a clear sealer from Krylon to protect the paint in the future. You could also use a brown glaze on the inside to give your glass a nice warm tone. I preferred the “original” look. I LOVE THEM!!! Total cost for about 5 mercury glass pieces……$8!!!

IMG_1746_edited-4

Obviously, due to the serious, flammable, toxic nature of the paint/sealer, no food items can go in these glasses!

Note, I have received many questions from people about actually using real candles inside their candle holders. I am not an expert on these types of things and only prepared this tutorial on how to make the glass containers! I’m a scaredy-cat so I wouldn’t put candles inside when done, but maybe after curing outside for a few days and all the fumes are gone it MIGHT be okay. But I am claiming no responsibility. Whatever you do with your completed Mercury glass, do at your own risk!!

Wishin’ & Hopin’ Part 2

After sharing my plans for the first floor of the house here, I realized that the list for the upstairs was actually busier than the first floor!!  Again, this list is based on the day I settled on the house. Some of these things have been done, are in progress, or are just fantasies that I dream of having!

STAIRWAY/UPSTAIRS HALLWAY

steps

  • Paint wall above wainscoting
  • Swap out outlets and light switches for white
  • If living room carpet ever gets removed, removal would contiue up the steps & into the hallway – FANTASY!

Hallway

  • Figure out linen storage soultion in hall corner (nowhere to store this stuff in the bathroom) – this is a bonus picture I didn’t share before b/c the only picture I had from before moving in was blurry! But now you get the idea – tiny space!

BATHROOM

bathroom 1

  • Paint over shell border
  • Remove icky carpet on bathroom floor
  • Paint upper cabinets white
  • Remove built-in hairdryer!
  • Stain lower cabinet dark espresso color
  • Remove shower door
  • Replace cabinet hardware
  • Replace outlet & light switches for white (1/2 done)
  • Paint/replace door handle and hinges
  • Cover or replace tile floor
  • Resurface tub and tiled walls (white)
  • Replace fitures in sink and shower (they are silver w/ gold accents like the rest of the hardware)
  • Replace gold toilet handle
  • Incorporate some sort of additional, minimal storage

MASTER BEDROOM

bedroom 2 bedroom 3 bedroom 5 bedroom 4

  • Remove smelly, badly imprinted carpet
  • New carpet or refinish hardwood floors depending on cost
  • Remove built-in dresser (see 2nd bedroom picture above – dresser under wall-mounted tv was built in – no carpet underneath so if I was removing it, existing carpet would be an issue – thankfully the carpet was gross and had to go!)
  • Remove white shelves on wall above built in dresser (see bedroom picture 1 above)
  • Paint entire room
  • Paint inside of closet & cubby area near window
  • Replace white ceiling fan
  • Replace standard “boob” light (see 2nd bedroom picture above)
  • Switch out outlets & light switches for white
  • Replace pink blinds throughout the room
  • Paint built-in dresser next to closet
  • Build bed frame with headboard for bed
  • Wall art for wall opposite large closet and where old white shelves used to be

SPARE BEDROOM

spare bed 1

  • Remove ugly, smelly blue carpet
  • Refinish hardwood floors
  • Remove ceiling fan, replace with ceiling light
  • Paint all built-in’s
  • REMOVE CORKBOARD FROM THE WALL
  • Build some additional storage shelves in closet for linen storage
  • Paint walls & ceiling

I feel like the 2nd floor list is a whole lot longer than the first, HOWEVER, it felt good to almost entirely cross off the Master Bedroom list! And I am definitely making progress in the bathroom. Those projects have been underway over the past few weeks and will continue over the summer. The bathroom was a cheaper option than redoing the kithen at this point so that’s where the $$ is going!  The spare bedroom and that stupid cork wall are my nemesis right now. I am too ashamed to even show you what that room looks like at this point in time. And it will be ages before that cork wall is all clear!

There you go! The full inside house list! Anyone want to volunteer to come over and scrape off cork tiles with me?!?! I’ll provide food and alcohol…..lots of alcohol!

High Five for Friday!!!!

Besides blogging, one of the things I love to do most is stalk read other blogs!! You can find some of my favorites over on the right side under my blog roll. There is nothing I love more than stumbling on a new blog and taking a few days to read it start to finish. Its a sickness I have!!!

Anyway!!! One of my most recent blog finds is Lauren Elizabeth. Lauren and her incredibly, amazingly talented sister Kate seem so sweet and I loved finding their blogs! Lauren does a weekly post called High Five for Friday where she highlights 5 of her favorite things from her week and invites other bloggers to do the same and link up over at her page.

In keeping with my new flow of being a lifestyle blogger – not just a “shelter/DIY” blogger, I am going to start linking up with Lauren on Fridays!

So, here is my first High Five for Friday!!!

photo-12

Note, three weeks before getting back into this blogging adventure, I broke my good Cannon DSLR camera. Well more specifically the lens, so until I bite the bullet to get it fixed, I gotta work with cell phone pics! Total poor quality I know!!!

1. I rounded out last weekend with some shoe shopping. I only went in for one specific pair (brown sandals on the left) and I realized I needed black shoes for an upcoming wedding (and on sale for $20) and then I needed new nude pumps (on sale for $30)! They were all necessities! I swear!!

2. I became a fan of the show Nashville on ABC this year. These two girls are the “daughters” on the show. Their mother on the show plays a famous country singer. One week, the two girls sang a version of “Ho Hey” and I about fell off the couch! Then this week I found this video and I can’t get enough! I have listened to these amazing little singers on repeat all week long!

3. This isn’t really a favorite thing in my week, however…..I have been using a personal trainer for the past year and have been frustrated with a lack of results after all the stinkin’ effort I put in. I HATE the gym and working out is torture and with all he puts me through I was mad it wasn’t working. So it came time to keep a food journal and eat “diet” dinners every night of grilled chicken and veggies. Now, I’m not complaining because I probably would eat this without a diet, but I am totally high-fiving Friday because I let myself “cheat” for one meal over the weekend – so high five it’s the weekend!!!

4. Summer dresses!! It totally hit the 90’s here in PA a week or so ago. I decided this week (while it was in the 70’s and a smidge chilly) that it was time to break out the dresses. This dress from the J-Crew outlet (bought during their Memorial Day half-off sale makes me feel nautical and ready for the beach! Not to mention my new nude pumps! (Side note, those pumps are Fergalicious brand. The first day I wore them I sang “Fergalicious” to myself all day long!)

5. And #5 to round out my week…..and by far the most EXCITING is the launch of The Landing Pad!! I am so excited to be back blogging and can’t wait to build this blog and followers and share house projects, me projects, recipes, clothes, makeup etc!!

Happy Weekend!!

I am linking up over at Lauren Elizabeth for High Five for Friday!

 photo H54Fbutton-1_zpsa7aaa665.png